Size Guide for Our Pants & Shorts

Shopping online for clothing can be challenging and stressful, often leaving you anxious about getting the perfect fit—worried it might be too long, too wide, too short, too tight, or too baggy when it arrives.

At Clara & Leila, we understand your concerns, that’s why we’ve created a detailed page with clear instructions, allowing you to easily select the right size using just a ruler or measuring tape and a garment you already own.

Even with this guidance, we at Clara & Leila want to instill complete confidence in your shopping experience. That’s why we’re thrilled to offer all customers a one-time size exchange on every purchase. If the clothing doesn’t fit as expected after arrival, we’ll ship you a new item in the correct size, completely at our cost.*Terms and conditions apply.*

How To Measure - Pants & Shorts

We recommend measuring a similar garment you already own that fits you well, like a pair of pants or shorts.
 
To ensure accurate sizing, please only measure a pair of pants or shorts with a TIGHT FIT (NON-STRETCHY) OR NORMAL FIT (NOT RELAXED OR LOOSE FIT), as using an oversized garment may result in incorrect measurements and the wrong size selection.
 
If you are purchasing a pair of loose-fit pants or shorts, please do not compare measurements or choose a larger size just to ensure it’s loose on you—we’ve already designed it to be comfortably relaxed as seen in the product images; the size chart is provided purely as a reference guide for selecting your size based on your existing garments, IT IS NOT the dimensions of the product you’ll receive.
 

This helps you compare it directly to our size charts and choose the right size without guessing. Lay the garment flat on a smooth surface and use a soft measuring tape or ruler. Don’t stretch the fabric—keep it relaxed.

Size Chart - Pants & Shorts (cm) XXS XS S M L XL XXL
Waist
29-32
31-34
33-36
35-38
37-40
39-42
41-44
Hips
42-45
44-47
46-49
48-51
50-53
52-55
54-57
Inseam Length
69-72
70-73
71-74
72-75
73-76
74-77
75-78
Pants Full Length (Outseam)
92-96
93-97
94-98
95-99
96-100
97-101
98-102
Shorts Full Length (Outseam)
28-32
29-33
30-34
31-35
32-36
33-37
34-38
1. Waist

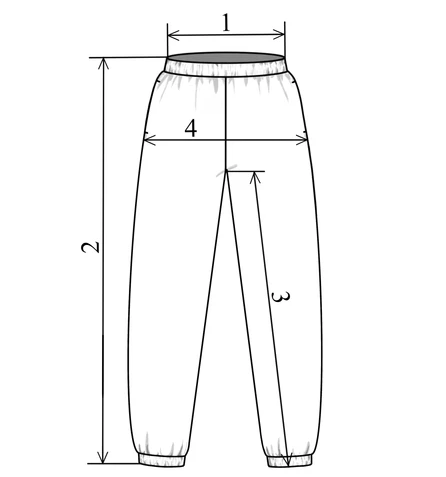
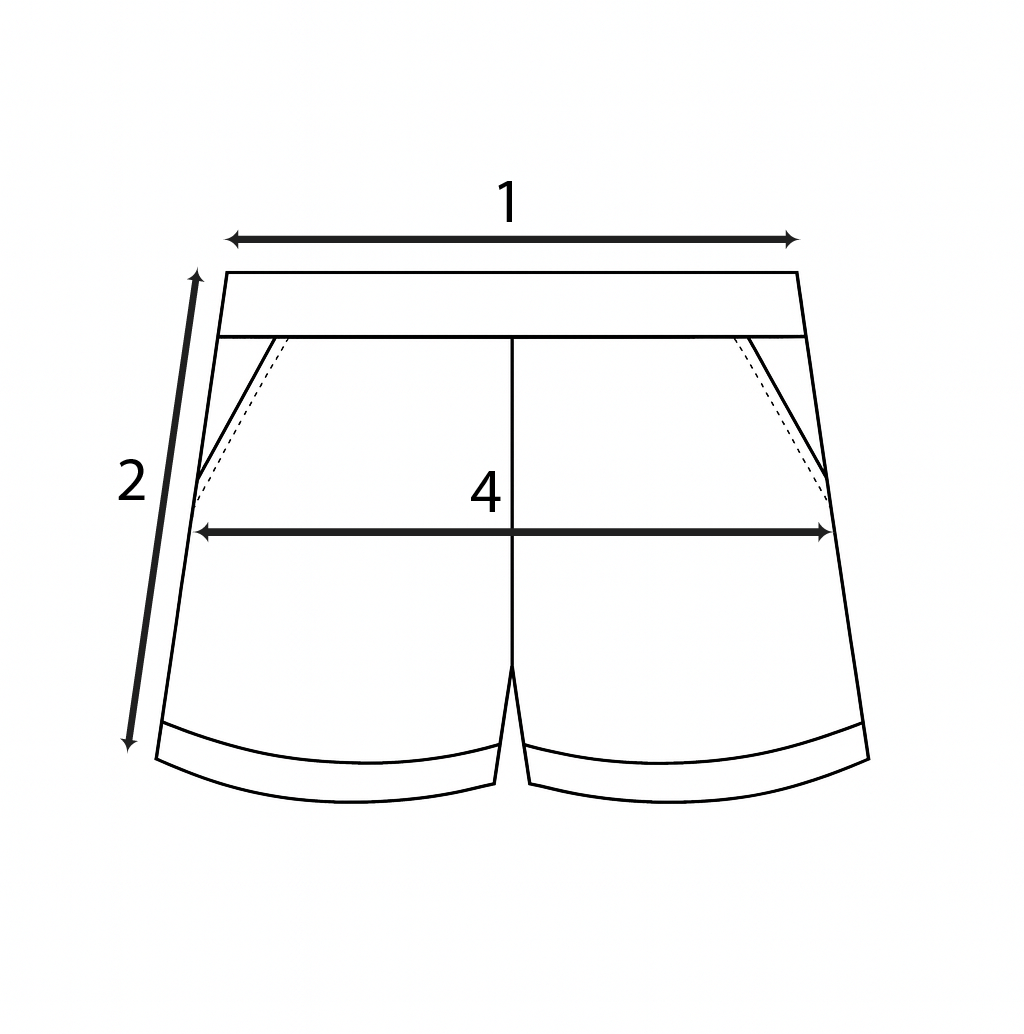
This measures the width around the waistband, helping ensure the pants sit comfortably without gaping or pinching.

  • Step 1: Lay the pants flat on their front, with the waistband aligned and any buttons or zippers fastened.
  • Step 2: Smooth out wrinkles along the top edge.
  • Step 3: Place one end of the tape at one side of the waistband (at the seam or edge).
  • Step 4: Measure straight across to the opposite side.
  • Step 5: Read the measurement in cm.
  • Tip: For high-waisted styles, measure at the top; for low-rise, at the widest waist point.
2. Pants & Shorts Full Length (Outseam)

This measures the total outer length from waist to hem, showing the overall leg length.

  • Step 1: Lay the pants or shorts flat with one leg extended.
  • Step 2: Place one end of the tape at the top edge of the waistband (outer side).
  • Step 3: Run the tape straight down the outer leg seam (or edge) to the bottom hem.
  • Step 4: Read the measurement in cm (include the waistband height).
  • Tip: Measure along the side for accuracy.
3. Inseam Length

This measures the inner leg length from crotch to hem, affecting how the pants fall on your legs.

  • Step 1: Lay the pants flat with legs extended straight.
  • Step 2: Find the crotch seam (where the legs meet at the center).
  • Step 3: Place one end of the tape at the bottom of the crotch seam (inside the leg).
  • Step 4: Run the tape straight down the inner leg seam to the bottom hem.
  • Step 5: Read the measurement in cm.
  • Tip: For shorts, this isn’t a necessary measurement.
4. Hips (Widest Point)

This measures the widest part around the hip area, ensuring room for movement without tightness.

  • Step 1: Lay the pants flat on their front.
  • Step 2: Identify the widest point of the hips—this is usually 18-23 cm below the waistband, around the seat or pocket area.
  • Step 3: Place one end of the tape at one side seam (or edge) at that widest point.
  • Step 4: Measure straight across to the opposite side seam.
  • Step 5: Read the measurement in cm

Understanding Overlapping Numbers in Our Size Charts

You might notice that the measurement ranges in our size charts overlap slightly between sizes, like 35-37 cm for XS shoulders and 36-38 cm for S. This is normal and designed to make sizing easier and more flexible—here’s why, explained simply:

  • Why Overlaps Exist: Clothing sizes aren’t “one-size-fits-all” because fabrics stretch differently, bodies vary, and fits (like fitted vs. loose) add extra room. For example, a 36 cm shoulder might work in an XS if you want a snug fit or in an S if you prefer a bit more space. Overlaps account for these real-life differences, so there’s no “gap” where a measurement doesn’t fit any size.
  • How to Handle Overlaps: If your measurement falls in the overlap (e.g., 37 cm for shoulders), look at your other measurements (like chest) to decide. Then, think about your style preference:
    • Choose the smaller size (e.g., XS) for a tighter, more fitted look.
    • Choose the larger size (e.g., S) for more comfort or room to layer.
  • Example: If your top measures 36 cm shoulders, 42 cm chest, and 62 cm length, it overlaps XS and S in shoulders but might match S overall—check the full chart!
  • If your measurements don’t match perfectly or you have questions about a specific product, contact xia@claraleila.com for personalized advice.
© 2025 Clara & Leila. All Rights Reserved.